
Ask Hytrol: How to Install a Shaft-Mounted Drive
Welcome to Ask Hytrol. Today, we’ll demonstrate how to properly install a shaft-mounted drive on a Hytrol conveyor.
You will need the following tools: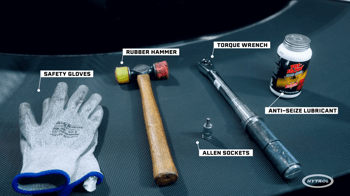
- Torque wrench
- Allen Sockets
- Rubber hammer
- Anti-seize lubricant with a soft-bristle brush
- Safety gloves
For your safety and the safety of those around you, always perform lockout/tagout procedures on all machinery before beginning work to ensure the conveyor is safe to service.
Ensure the conveyor is properly supported and stationary. Inspect the drive shaft for any signs of damage, debris, or rust. Clean all components using a degreasing agent. If necessary, use an emery cloth to clean the shaft.
Insert the support bushing into the clamping ring. Install the clamping ring, ensuring the bore step faces toward the reducer. Make sure the settings on the clamping ring match those on the torque wrench. Torque down the clamping ring.
Apply assembly paste evenly over the entire surface of the support bushing. Then, install the reducer onto the shaft.
Before installing the shrink disc, make sure all bolts are loose. Slide the shrink disk onto the torque lock shaft until it rests against the shaft shoulder. Apply assembly paste to the torque bushing and gently tap it into place until fully seated.
With two fingers on each side of the shrink disk, tighten two opposite bolts at the same time until the slack is taken up. Continue rotating around the disc, tightening all bolts finger-tight. Be careful not to overtighten.
Locate the proper torque setting etched into the side of the shrink disc. Starting with the top bolt and using a torque wrench, tighten each bolt ¼ turn in a clockwise pattern (as demonstrated below). Do not use a crisscross pattern, as this may cause the shrink disc to bind and prevent proper clamping force on the shaft.
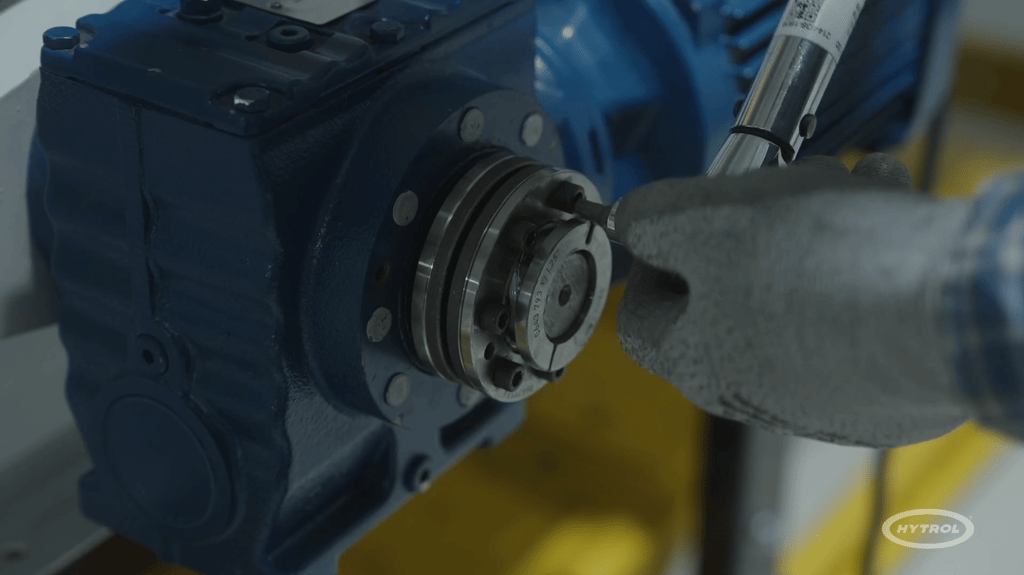
Repeat this process until all bolts reach the correct torque value. It should take at least 8 to 10 full passes around the shrink dish. Continue until every bolt “pops” (reaches torque) immediately when the wrench is applied. If not, keep going.
After installation, perform the following checks to confirm proper installation:
✅ Check for clearance between the shoulder and the clamping ring.
✅ Ensure there is clearance between the shrink disc and the support bushing.
✅ The shrink disc halves should be parallel and evenly tightened.
❌ If the halves are uneven, recheck the installation for errors.
✅ There must be a gap between the shrink disc halves. A lack of clearance may indicate the torque bushing is not properly seated.
As with all installations, safety is the top priority. Before putting the system into service ensure the torque lock cover is securely installed and perform a final inspection to confirm all components are properly fastened.
You have now successfully installed a shaft-mounted drive on a Hytrol conveyor, and your machine is ready to return to service.
For more maintenance tips and information, contact your Hytrol solutions provider.